
Do you have a golf cart? If so, you need to check its battery charger. A good battery charger is very important. It keeps your golf cart running well. Here is how you can check your golf cart battery charger.
Why Check the Battery Charger?
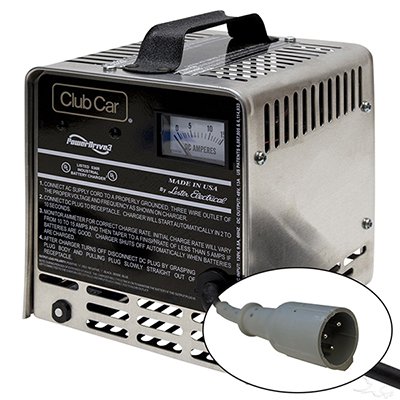
The battery charger is like the heart of your golf cart. It gives power to the battery. Without a good charger, your golf cart will not work well. It may stop running. That is why you need to check it often.
Tools You Will Need
You need some simple tools. These tools will help you check the battery charger. Here is what you need:
- Multimeter
- Screwdriver
- Safety gloves
- Safety glasses
These tools are easy to use. You can find them at any hardware store.
Step-by-Step Guide
Follow these steps to check your golf cart battery charger:
Step 1: Safety First
Wear your safety gloves and glasses. This will keep you safe. Do not skip this step. Safety is very important.
Step 2: Check The Power Outlet
Plug the charger into the power outlet. Check if the outlet has power. You can use a lamp to check. If the lamp lights up, the outlet has power. If not, try another outlet.
Step 3: Inspect The Charger
Look at the charger. Check for any signs of damage. This can be cracks or broken parts. If the charger looks damaged, do not use it. You will need to get a new charger.
Step 4: Use The Multimeter
The multimeter is a tool that measures electric current. Set the multimeter to DC volts. Connect the multimeter to the charger. The red lead goes to the positive terminal. The black lead goes to the negative terminal. Turn on the charger.
Step 5: Read The Multimeter
Look at the multimeter reading. A good charger will show a voltage between 36 to 48 volts. If the reading is lower, the charger may be bad. You might need to replace it.
Step 6: Check The Charger Fuse
Some chargers have a fuse. The fuse protects the charger from damage. If the charger does not work, check the fuse. Remove the fuse and look at it. If the fuse is blown, replace it. You can buy a new fuse at a hardware store.
Step 7: Check The Battery Connections
Look at the battery connections. Make sure they are clean and tight. Loose or dirty connections can cause problems. Clean the connections with a wire brush. Tighten them with a screwdriver.

Credit: www.vatrerpower.com
When to Get Help
Sometimes, you may need help. If the charger still does not work, call a professional. They know how to fix it. Do not try to fix it if you are not sure. It can be dangerous.

Credit: www.wikihow.com
Maintaining Your Charger
Keep your charger in good shape. Store it in a cool, dry place. Do not let it get wet. Check it often for damage. Clean it with a dry cloth. This will help it last longer.
Frequently Asked Questions
How Do I Test My Golf Cart Battery Charger?
Use a multimeter to check voltage output. It should match the charger’s rating.
What Voltage Should My Golf Cart Charger Read?
A fully charged 36V system should read around 38-39 volts.
Why Is My Golf Cart Charger Not Working?
Check for loose connections, a blown fuse, or a faulty outlet.
Can A Golf Cart Charger Be Repaired?
Yes, many issues can be fixed. Consult a professional if unsure.
Conclusion
Checking your golf cart battery charger is easy. It only takes a few steps. Use the right tools. Follow the steps carefully. Keep your charger in good shape. This will help your golf cart run well. Happy golfing!


Leave a Reply