
Testing a starter on a golf cart is essential for smooth operation. It ensures your cart starts reliably.
Golf carts are great for short trips, but a faulty starter can leave you stranded. Knowing how to test the starter can save you time and money. Whether you’re a golf enthusiast or use a cart for other purposes, understanding this process is valuable.
In this guide, we will explain how to test your golf cart’s starter. You’ll learn simple steps to check if your starter is working correctly. This knowledge can help you maintain your golf cart and avoid unexpected issues. Let’s get started on ensuring your golf cart runs smoothly every time.
Introduction To Golf Cart Starters
A golf cart starter is crucial for its operation. This small device helps start the engine. Without it, your golf cart won’t run. Understanding how the starter works can save time and money.
Golf cart starters are electric motors. They engage with the engine’s flywheel to start the cart. Once the engine runs, the starter disengages. Knowing this process helps in troubleshooting.
Importance Of A Starter
The starter is vital for the golf cart. It kicks off the engine’s operation. A faulty starter means no movement. It’s essential for the cart’s reliability.
Regular checks on the starter ensure smooth rides. It prevents unexpected breakdowns. Keeping the starter in good shape is a must for every golf cart owner.
Common Starter Issues
Several problems can affect a starter. A common issue is a weak battery. Without enough power, the starter won’t work. Another problem is loose connections. These can prevent the starter from engaging.
Sometimes, the starter motor itself fails. This might be due to wear and tear. Regular maintenance can help catch these issues early. Knowing these common problems can help you fix your golf cart quickly.

Credit: www.youtube.com
Essential Tools And Equipment
Testing a starter on a golf cart requires a multimeter and jumper cables. Check the battery voltage and starter connections. Ensure all components are functioning properly for a smooth start.
Testing a starter on a golf cart requires the right tools and equipment. Having these on hand ensures the process goes smoothly and safely. This section will cover the essential tools and safety gear needed for the task.Tools Required
You will need a few basic tools to test the starter. A multimeter is crucial for checking voltage and continuity. You will also need a wrench set to remove and install parts. A battery charger can help if the battery is low. Jumper cables are also useful for testing purposes. Lastly, keep a screwdriver set handy for any small adjustments.Safety Gear
Safety is a top priority when working on a golf cart. Always wear safety glasses to protect your eyes from debris. Gloves are essential to protect your hands from sharp objects and chemicals. Wear a long-sleeve shirt to protect your arms. Make sure you work in a well-ventilated area to avoid inhaling fumes. Using a face mask can provide extra protection if needed. Always have a fire extinguisher nearby in case of emergencies. “`Preparing The Golf Cart
Testing the starter on your golf cart requires proper preparation. This step ensures safety and accuracy. Proper preparation involves positioning the cart correctly and disconnecting the battery. Let’s dive into the details.
Positioning The Cart
First, park your golf cart on a flat surface. A level area prevents the cart from moving unexpectedly. Make sure the parking brake is engaged. This step is crucial for safety. Next, turn off the ignition. Double-check that the keys are removed. This prevents accidental starting during the test.
Disconnecting The Battery
Before working on the starter, disconnect the battery. This step prevents electrical shocks or shorts. Follow these steps:
- Locate the battery compartment. Typically, it’s under the seat.
- Use a wrench to loosen the negative (-) terminal first. This minimizes the risk of sparks.
- Next, loosen the positive (+) terminal.
- Remove both cables from the battery. Keep them away from the terminals.
Now, your golf cart is safe to work on. You can proceed to test the starter without risk.
Accessing The Starter
Accessing the starter on a golf cart is a crucial step in testing its functionality. This process involves locating the starter and removing any obstructions that may hinder your access. By carefully following these steps, you can ensure a smooth and efficient testing experience.
Locating The Starter
Begin by identifying the position of the starter on your golf cart. It is usually found near the engine. Consult your golf cart’s manual for specific details. This will guide you to the exact location. Look for a cylindrical component attached to the engine block. This is the starter.
Removing Obstructions
Once you have located the starter, clear any items that may block your access. This includes wires, covers, and other components. Carefully disconnect any wires connected to the starter. Use appropriate tools to remove bolts or screws holding covers in place. Ensure a clear path to the starter for easy testing.
With the starter fully accessible, you can proceed to test it. This will help you determine if it is functioning correctly. Always follow safety guidelines while working on your golf cart.
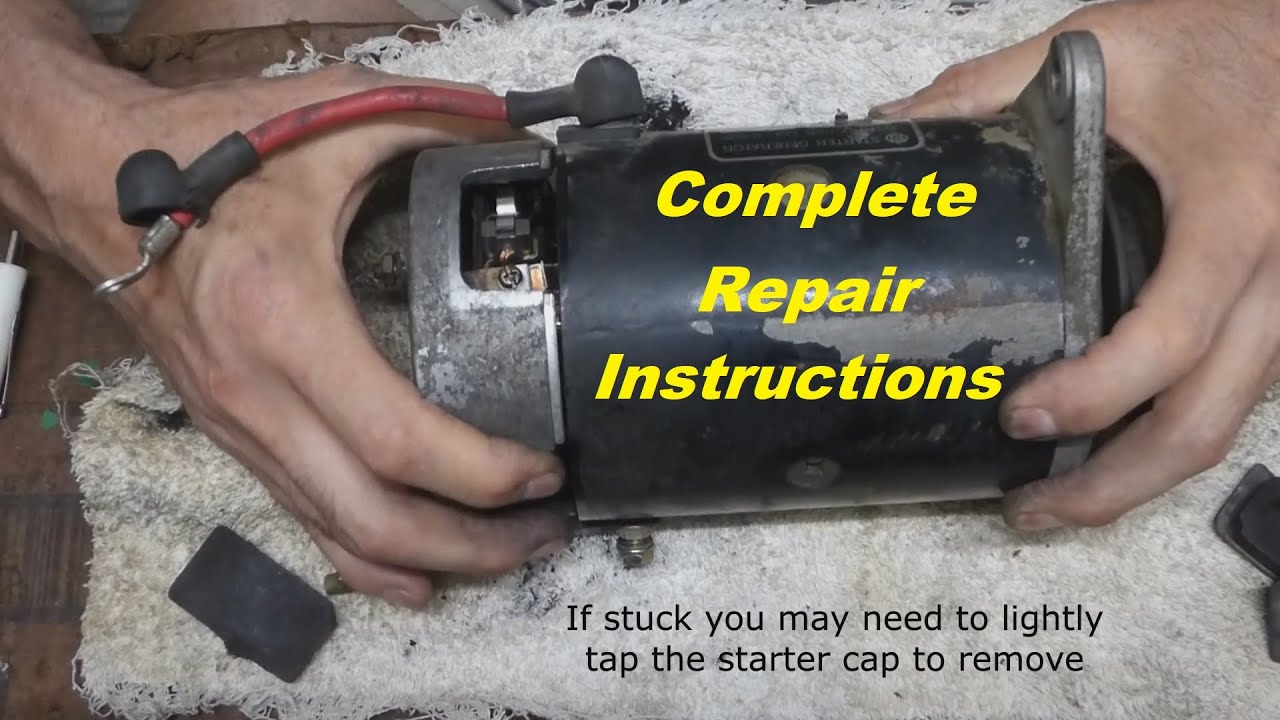
Testing The Starter
When your golf cart won’t start, the problem could be with the starter. Testing the starter is a straightforward process. It involves a few essential steps to ensure it is functioning correctly.
Visual Inspection
Start with a visual inspection. Check for any visible signs of damage. Look at the wires connected to the starter. Ensure they are not frayed or loose. A damaged wire can prevent the starter from working.
Inspect the starter motor for any signs of corrosion. Corrosion can impede electrical connections. Clean off any corrosion you find. Use a wire brush or a corrosion cleaner.
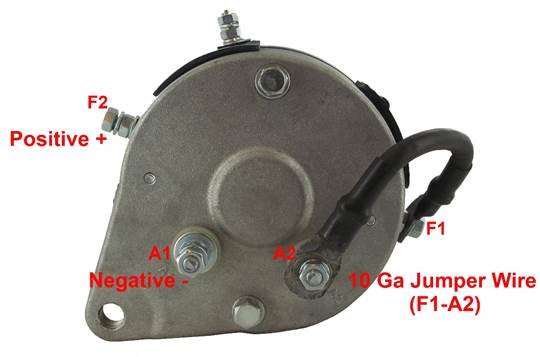
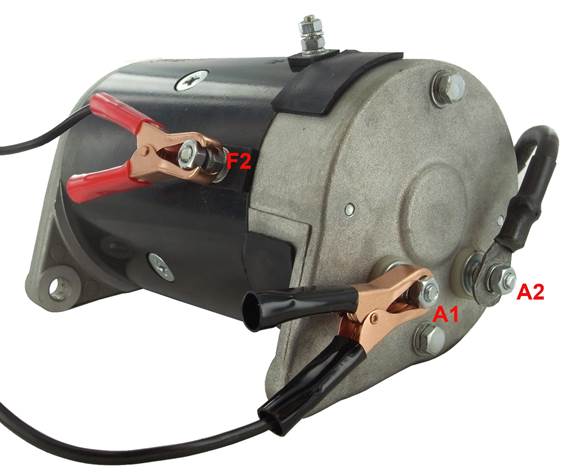
Conducting Electrical Tests
Next, conduct some electrical tests. Use a multimeter to check the battery voltage. A fully charged battery should read around 12.6 volts. If the battery voltage is low, recharge it before testing the starter.
Follow these steps to test the starter:
- Set your multimeter to the voltage setting.
- Connect the multimeter probes to the starter terminals.
- Turn the ignition key to the start position.
- Check the multimeter reading.
The voltage should drop slightly but not below 9.5 volts. If the voltage drops too much, the starter may be faulty.
Also, check the starter solenoid. Use the multimeter to measure continuity. Place the probes on the solenoid terminals. If there is no continuity, the solenoid is defective.
By following these steps, you can determine if the starter needs replacing. Regular maintenance can prevent starter issues. Always keep your golf cart in good condition.
Interpreting Test Results
After testing the starter on your golf cart, interpreting the results is key. This helps you understand the condition of the starter. It also tells you what steps to take next. A clear understanding of the results can save you time and money.
Knowing how to read the test results helps you decide if the starter needs repair or replacement. Below, we discuss the signs of a faulty starter and when to replace it.
Signs Of A Faulty Starter
A faulty starter shows specific signs. One sign is a clicking sound when you turn the key. This sound means the starter is not engaging properly. Another sign is the engine not turning over. This indicates the starter is not working.
If the starter motor spins without turning the engine, it is also a bad sign. This often means the starter gear is not engaging with the engine flywheel. Lastly, a burning smell can indicate a failing starter. This smell often means overheating or electrical issues.
When To Replace The Starter
Replace the starter if you notice any of the signs mentioned. Consistent issues even after attempts to fix them also indicate it’s time for a new starter. If the starter drains the battery quickly, consider replacing it.
Frequent repairs to the starter can add up in cost. In such cases, replacing the starter may be more cost-effective. Always consult a professional if unsure about the test results or the starter’s condition.
Reassembling The Golf Cart
After testing the starter on your golf cart, reassembling is crucial. It ensures everything works correctly and safely. Follow these simple steps to complete the process.
Reconnecting The Battery
First, locate the battery and the positive and negative terminals. Carefully attach the positive cable to the positive terminal. Secure it tightly with a wrench. Then, attach the negative cable to the negative terminal. Ensure it is also tight. This step is crucial for the cart to power up properly.
Securing All Parts
Next, check all the parts you had removed or loosened. Secure each part back to its original position. Use the appropriate tools to ensure everything is tight. Double-check all screws and bolts. This will help avoid any parts coming loose while driving. Finally, inspect the entire area for any leftover tools or parts. The golf cart should now be ready for a test drive.
Credit: www.youtube.com
Maintaining Your Golf Cart Starter
Maintaining your golf cart starter ensures your vehicle runs smoothly. A well-maintained starter extends the life of your golf cart. Regular attention prevents unexpected issues and keeps your rides enjoyable.
Regular Check-ups
Regular check-ups are essential for your golf cart starter. Inspect the starter every few months. Look for signs of wear or damage. Check the connections for any corrosion. Clean the terminals if you find any rust. Tighten any loose connections. A quick inspection can save you from bigger problems later.
Preventive Measures
Preventive measures help maintain your golf cart starter. Keep your battery charged. A weak battery strains the starter. Avoid starting the cart repeatedly in a short time. Let the starter cool down between tries. Store your golf cart in a dry place. Moisture can damage the starter. Follow these steps to prolong the starter’s life.
Credit: www.discountstarterandalternator.com
Frequently Asked Questions
How Do I Know If My Golf Cart Starter Is Bad?
Check for clicking sounds when turning the key. If the cart doesn’t start, the starter might be faulty.
Can I Test A Golf Cart Starter With A Multimeter?
Yes, you can use a multimeter to check the starter’s voltage. Ensure the readings match the manufacturer’s specifications.
What Tools Are Needed To Test A Golf Cart Starter?
You’ll need a multimeter, wrench, and screwdriver. These tools help in diagnosing the starter’s functionality.
How Do You Bench Test A Golf Cart Starter?
Remove the starter and connect it to a power source. Check if it spins properly to determine its condition.
Conclusion
Testing a starter on a golf cart is essential. It helps ensure smooth rides. Follow the steps to diagnose any issues. Use basic tools and follow safety guidelines. It’s not too hard with practice. Regular checks prevent bigger problems later.
Keep your golf cart in top shape. Enjoy your time on the course without worries. Happy golfing!


Leave a Reply